How to add additional IP?
Learn how to add additional IP addresses to your server with this step-by-step guide for CentOS, Debian, and Windows Server.
Before you start, open my.itldc.com, select your service, and go to IP addresses.

You will need the Mask and IP address.
CentOS 7, 8, Stream
STEP 1: Connect to your server using SSH.
STEP 2: To check your IP configuration, enter the following command:
ip addr
Sample output:
t qlen 1000
    link/loopback 00:00:00:00:00:00 brd 00:00:00:00:00:00
    inet 127.0.0.1/8 scope host lo
       valid_lft forever preferred_lft forever
    inet6 ::1/128 scope host
       valid_lft forever preferred_lft forever
2: ens3: <BROADCAST,MULTICAST,UP,LOWER_UP> mtu 1500 qdisc fq_codel state UP group default qlen 1000
    link/ether xx:xx:xx:xx:xx:xx brd ff:ff:ff:ff:ff:ff
    inet xxx.xxx.xxx.xxx/23 brd xxx.xxx.xxx.xxx scope global noprefixroute ens3
       valid_lft forever preferred_lft forever
    inet6 xxxx:xxxx::xxx scope global noprefixroute
       valid_lft forever preferred_lft forever
STEP 3: Open the configuration file “ifcfg-ens3” using nano or another text editor:
nano /etc/sysconfig/network-scripts/ifcfg-ens3
STEP 4: Copy the following items:
BOOTPROTO="none"
DEVICE="ens3"
HWADDR="XX:XX:XX:XX:XX:XX"
ONBOOT="yes"
IPADDR="XXX.XXX.XXX.XXX"
NETMASK="XXX.XXX.XXX.XXX"
GATEWAY="XXX.XXX.XXX.XXX"
DNS1=8.8.8.8
DNS2=1.1.1.1
IPV6INIT="yes"
IPV6ADDR="XXXX:XXXX::XXX/XX"
IPV6_DEFAULTGW="XXXX:XXXX::XXXX"
STEP 5: Create and open a new file using:
nano /etc/sysconfig/network-scripts/ifcfg-ens3:0
Paste the copied items and change:
- DEVICE to
eth3:0 - IPADDR to your second IP
- NETMASK to the mask of this IP address.
DEVICE="eth3:0"
IPADDR="XXX.XXX.XXX.XXX"
NETMASK="XXX.XXX.XXX.XXX"
ONBOOT="yes"
NOTE: To add more IPs, create files named ifcfg-ens3:1, ifcfg-ens3:2, etc.
STEP 6: Save the changes. In nano, press “Ctrl+X,” then “Y” to save changes, and press “Enter” to exit.
Debian 10, 11 / Ubuntu 16.04, 18.04, 20.04
STEP 1: Connect to your server using SSH.
STEP 2: Check your IP configuration:
ip addr
Sample output:
1: lo: <LOOPBACK,UP,LOWER_UP> mtu 65536 qdisc noqueue state UNKNOWN group default qlen 1000
    link/loopback 00:00:00:00:00:00 brd 00:00:00:00:00:00
    inet 127.0.0.1/8 scope host lo
       valid_lft forever preferred_lft forever
    inet6 ::1/128 scope host
       valid_lft forever preferred_lft forever
2: ens3: <BROADCAST,MULTICAST,UP,LOWER_UP> mtu 1500 qdisc fq_codel state UP group default qlen 1000
    link/ether xx:xx:xx:xx:xx:xx brd ff:ff:ff:ff:ff:ff
    altname enp0s3
    inet xxx.xxx.xxx.xxx/23 brd xxx.xxx.xxx.xxx scope global ens3
       valid_lft forever preferred_lft forever
    inet6 xxxx:xxxx::xxx scope global
       valid_lft forever preferred_lft forever
    inet6 xxxx:xxxx::xxx scope link
       valid_lft forever preferred_lft forever
STEP 3: Open the “interfaces” file:
nano /etc/network/interfaces
STEP 4: Add the following configuration:
# The primary network interface
auto ens3
iface ens3 inet static
    address xxx.xxx.xxx.xxx
    netmask 255.255.254.0
    gateway xxx.xxx.xxx.xxx
    hwaddress ether xx:xx:xx:xx:xx:xx
    dns-nameservers 1.1.1.1 8.8.8.8

auto ens3:0
iface ens3:0 inet static
    address xxx.xxx.xxx.xxx
    netmask xxx.xxx.xxx.xxx

iface ens3 inet6 static
    address xxxx:xxxx::xxxx
    netmask 32
    gateway xxxx:xxxx::xxxx
    dns-nameservers 1.1.1.1 8.8.8.8
NOTE: To add more IPs, add similar sections named ens3:1, ens3:2, etc.
STEP 5: Save the changes.
Windows Server 2012, 2016, 2019
NOTE: This example uses Windows 2012, but similar steps apply to newer versions.
STEP 1: Connect to your service using RDP or VNC as an Administrator.
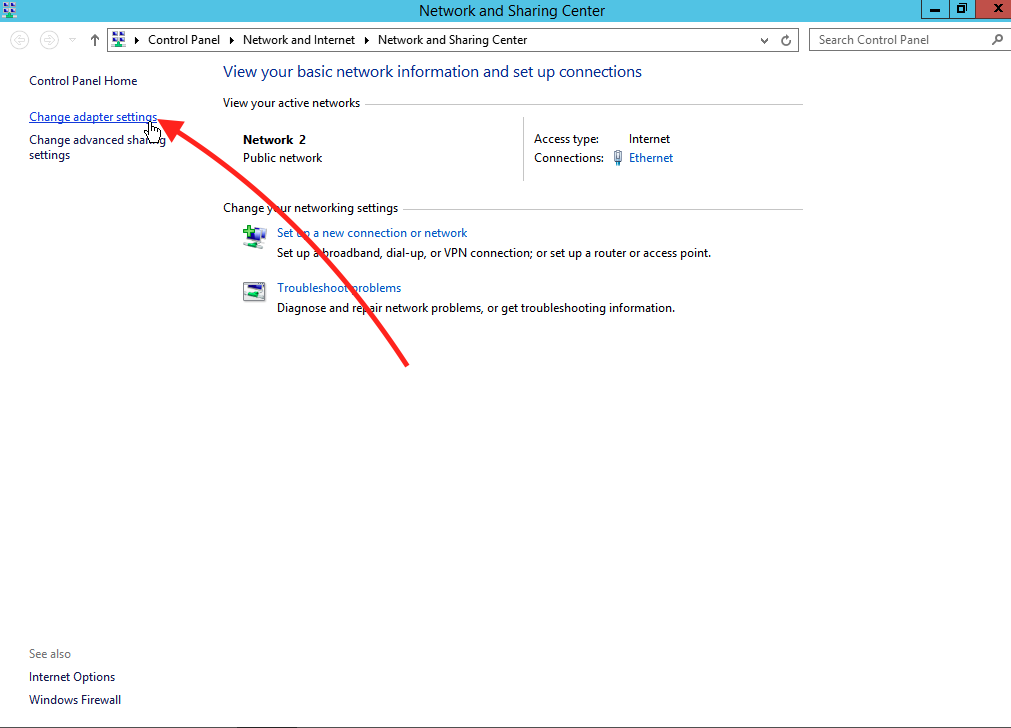
STEP 2: Open the Start menu and search for “Network and Sharing Center.”

STEP 3: Click on “Change adapter settings.”
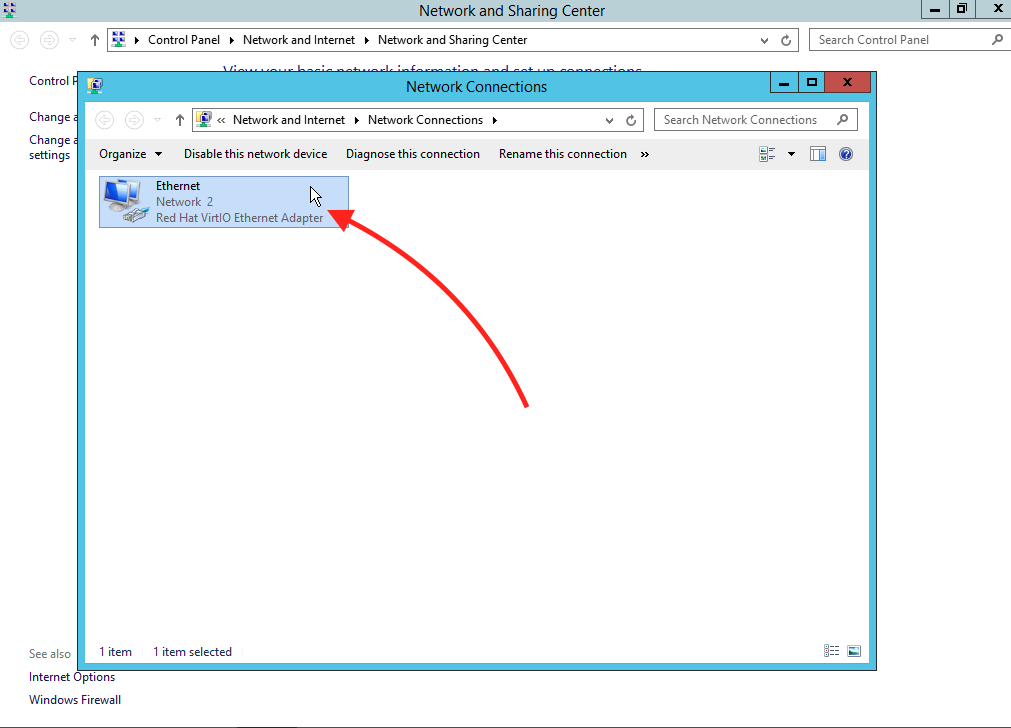
STEP 4: Select the Ethernet connection.
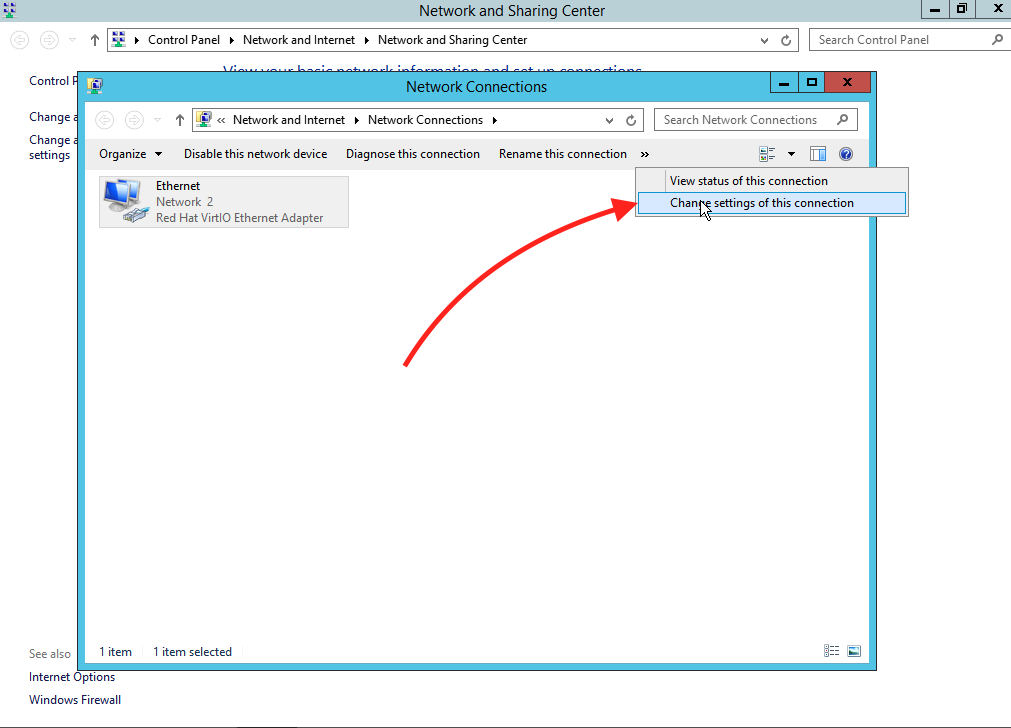
STEP 5: Click on “Change settings of this connection.”
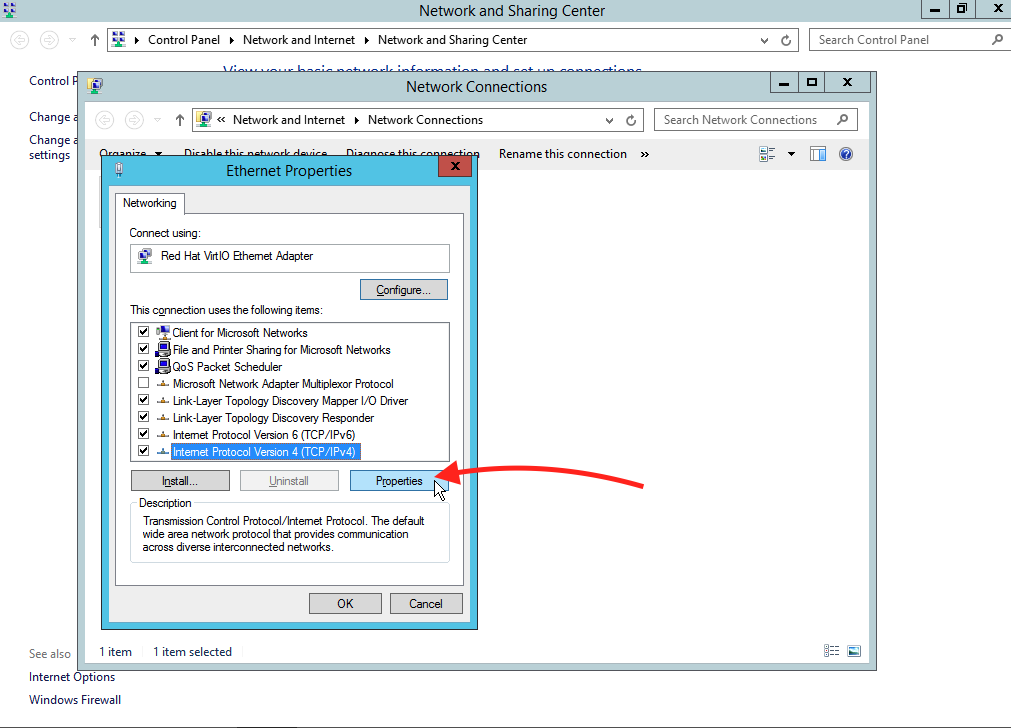
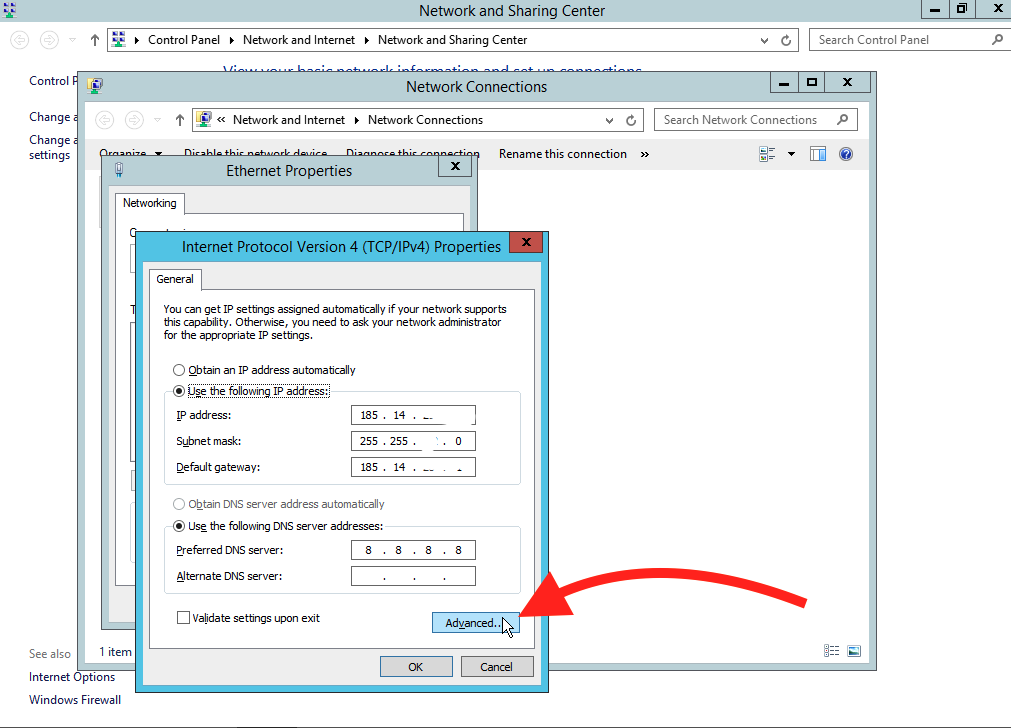
STEP 6: Select “Internet Protocol Version 4 (TCP/IPv4).”
STEP 7: Click on “Advanced…”
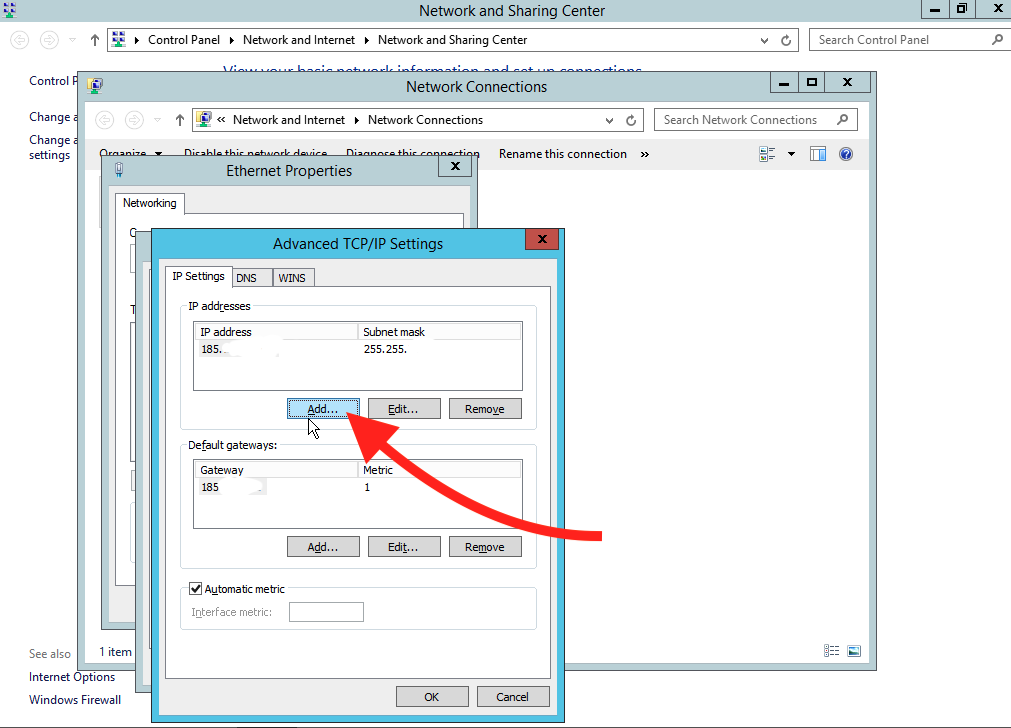
STEP 8: In the IP addresses section, click “Add…”
STEP 9: Enter your second IP address.
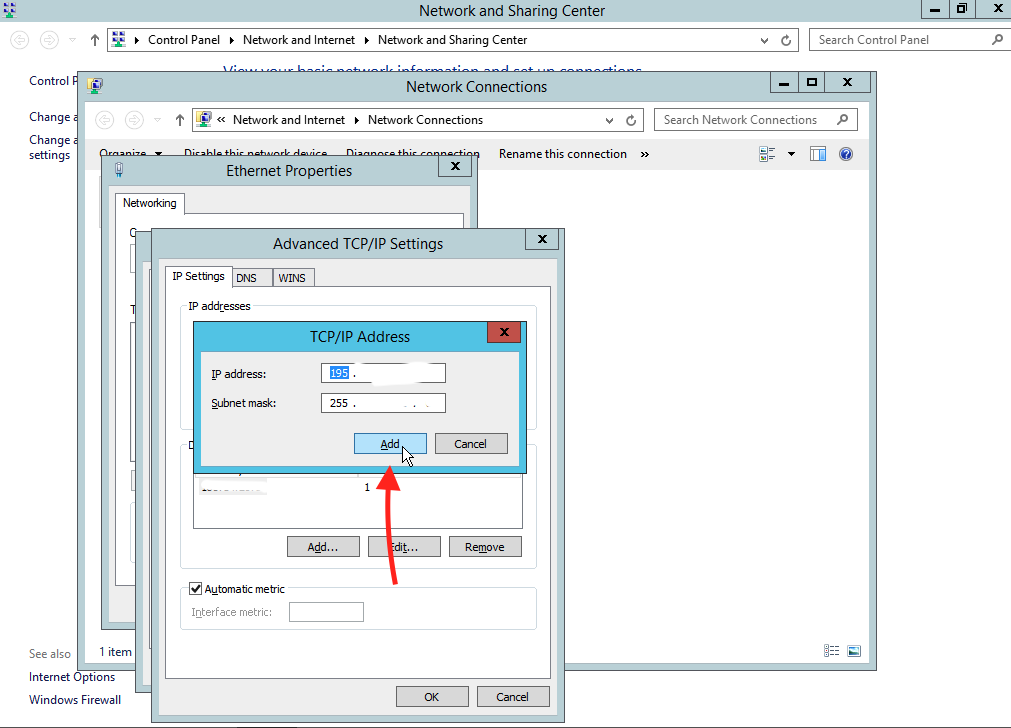
STEP 10: Click “OK” to save the changes.
Related Articles
Browse more articles in these categories.