Enabling IPv6 on VDS
Learn how to enable IPv6 on your Virtual Dedicated Server (VDS) with these essential configuration steps.
Enabling IPv6 on VDS
Progress cannot be stopped; IPv4 addresses are running out, and now is the time to start mastering the solutions that will underpin the future Internet. We will begin by configuring the IPv6 network subsystem of our VDS.
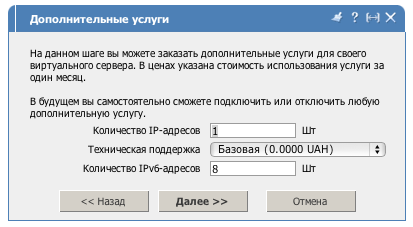
Ordering a New VDS
Order a new VDS, specifying a non-zero number of IPv6 addresses:
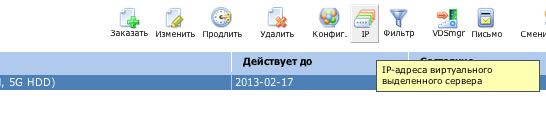
In a short while, the VDS will be created. In the corresponding tab, you will be able to see the assigned IPv6 and additional IPv4 addresses:
Adding IPv6 Addresses to Existing VDS
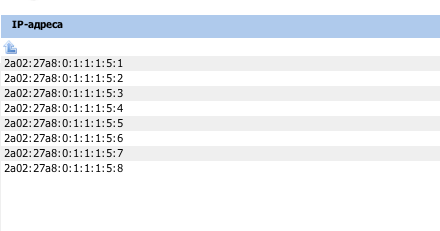
If you already have a VDS, order additional IPv6 addresses through the self-service system; they will be automatically assigned to you within a few minutes. The list will look something like this:
Configuring the Network Subsystem
The next step is to configure the network subsystem for the selected operating system. Unfortunately, at the time of writing, there is no automated setup for guest operating systems, so some effort will be required 🙂. Log in via SSH to the VDS. Describe the address on the network interface (note that the mask is /64, and the interface may be named eth0 or eth1 — check in advance with the command ‘ifconfig’ or ‘ip a’):
# ip -f inet6 addr add 2a02:27a8:0:1:1:1:5:2/64 dev eth0
Now we need to specify the default router for the IPv6 protocol. For ITL DC, the router address is 2a02:27a8:0:1::1 — and that is what we will specify:
# ip -f inet6 ro add default via 2a02:27a8:0:1::1 dev eth0
Verifying the Configuration
Check with the commands ping6 or traceroute6 to ensure everything is working:
# ping6 ipv6.google.com
PING ipv6.google.com(lb-in-x93.1e100.net) 56 data bytes
64 bytes from lb-in-x93.1e100.net: icmp_seq=1 ttl=57 time=27.5 ms
64 bytes from lb-in-x93.1e100.net: icmp_seq=2 ttl=57 time=23.0 ms
That’s all for now. Later, we will discuss the aspects of IPv6 configuration specific to different Linux and BSD distributions.
Need Help?
Our support team is available 24/7 to assist you with any questions or issues.
Contact Support