Portainer — Managing Docker Containers
Learn how to manage Docker containers effortlessly with Portainer—a user-friendly interface to oversee your microservices and application deployments.
Portainer — Managing Docker Containers
Using microservices based on Docker containers is becoming increasingly popular - it is convenient, allows for easy project scalability, data migration, and significantly improves security for many types of applications. Many users prefer a user-friendly graphical control panel - this is exactly why we recommend the Portainer management interface.
Portainer is installed as a regular Docker container, just like other Docker applications. As usual, we’ll use any SSD VDS and choose CentOS 7 as our operating system. After installing the operating system, we will connect to our server using any SSH client. We will install support for Docker, iptables, and start all necessary services:
systemctl stop firewalld
systemctl disable firewalld
yum -y install iptables-services
yum -y install epel-release
curl -fsSL https://get.docker.com/ | sh
systemctl start docker
systemctl enable docker
Now, let’s install and start the Portainer container:
docker volume create portainer_data
docker run -d -p 9000:9000 -v /var/run/docker.sock:/var/run/docker.sock -v portainer_data:/data portainer/portainer
The first command creates a persistent storage volume called portainer_data - this is necessary so that its data and settings are preserved during reinstallation or updates. The second command installs and starts Portainer, whose management interface will be accessible on port 9000.
Let’s check if the container with our management panel is running using the command docker ps:
[root@docker-test ~]# docker ps
CONTAINER ID    IMAGE               COMMAND                  CREATED             STATUS              PORTS                    NAMES
d0edb80f6cf7   portainer/portainer "/portainer"           7 seconds ago      Up 6 seconds        0.0.0.0:9000->9000/tcp mystifying_heisenberg
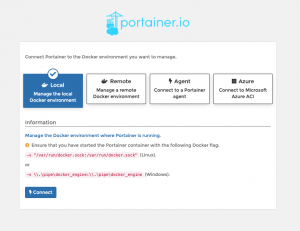
Great! Now, let’s open our favorite browser and connect to our server using port 9000:

We set a password and then choose the operational mode for our panel. Since we are using only one server, we select the local mode.
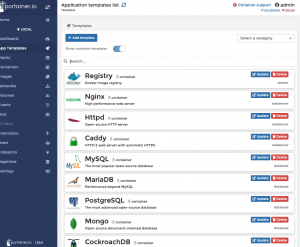
Now, let’s go to our Endpoint, which is named local. Let’s attempt to deploy an application - like WordPress along with all its necessary components.

In the App Templates section, we select the template named WordPress.
This template includes two containers - a MySQL server and WordPress along with PHP and Apache. We specify the desired MySQL password (it will also be indicated in the WordPress settings and in the MySQL user account), start the installation process, and in a couple of minutes our stack is ready!

As usual, we can check which containers are running using the command line with the command docker ps:
[root@docker-test ~]# docker ps
CONTAINER ID    IMAGE               COMMAND                  CREATED             STATUS              PORTS                    NAMES
91b7377be5b8   wordpress:latest    "docker-entrypoint.s…" 3 hours ago        Up 3 hours        0.0.0.0:32768->80/tcp wp1_wordpress_1
71a7f0d41f5f   mysql:5.7          "docker-entrypoint.s…" 3 hours ago        Up 3 hours        3306/tcp, 33060/tcp wp1_db_1
1a2fa98185df   portainer/portainer "/portainer"           3 hours ago        Up 3 hours        0.0.0.0:9000->9000/tcp mystifying_heisenberg
Note that WordPress will be available by default on a non-standard external port - in this case, 32768. If necessary, in the WordPress container settings, you can change the port to 80, but it would be better to additionally install a container with nginx and use that product for traffic proxying, enabling SSL, etc. Moreover, using nginx to handle external connections is justified in situations where you need to host additional websites or applications. In this case, the additional applications will use separate, unique ports, and with nginx and the use of proxy_pass directives, you can configure nearly unlimited simultaneous operations of multiple applications within a single Docker node.
Docker is a convenient and powerful tool. We recommend it!
Need Help?
Our support team is available 24/7 to assist you with any questions or issues.
Contact Support