Launching Your Own VPN Server on SSD VDS in Just a Few Minutes
Learn how to quickly set up your own VPN server on SSD VDS with our easy guide. Protect your internet traffic in just a few minutes!
Launching Your Own VPN Server on SSD VDS in Just a Few Minutes
We strive to make using our services simpler and more accessible — after all, SSD VDS servers are ordered not only by hardcore UNIX administrators managing their servers through black terminal windows 🙂 One option to save time and effort for our users is to provide ready-made, pre-configured SSD VDS tailored for specific tasks. Let’s discuss how to quickly obtain an SSD VDS, prepared for use as a personal VPN server, in just a couple of minutes.
Step 1: Create an Account
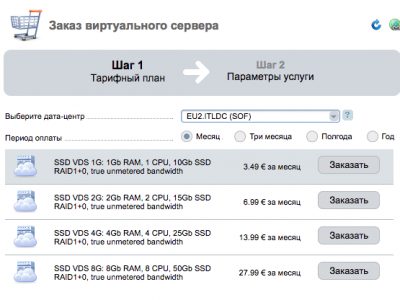
We’ll start with the simplest step — create an account at my.itldc.com, providing a name, valid email address, and password. Then we go to “Virtual Servers” and click the “Order” button in the menu. For personal VPN, the most basic plan is usually enough, so we select it:
Step 2: Choose Your Operating System
The next step is to choose the operating system and other parameters. We can leave CentOS 6 or CentOS 7 — it’s up to us, and in “Pre-installed Software” we select the desired VPN option:
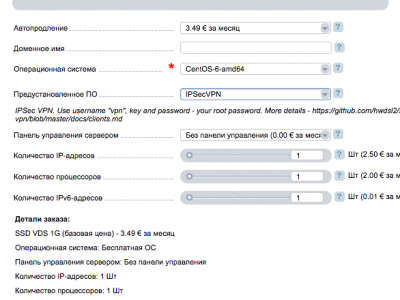
Currently, there are two options — OpenVPN AS and IPSec VPN. The first option, OpenVPN, requires client software installation available for Windows, Mac, Android, and iOS. Advantages include generally more stable operation over various public networks.
The second option, IPSec (L2TP) VPN, is more standard, as everything needed for the connection setup is already available in all operating systems. We will choose this type of VPN, order it, and pay for the virtual server.
Step 3: Access Parameters
In a few minutes, an email will arrive containing access parameters:
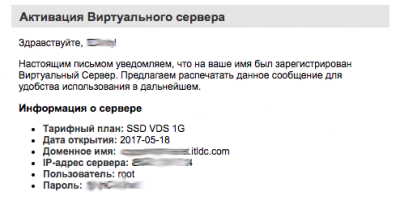
We’ll save it, as we will need the password specified in the email and, of course, the IP address of our server. Let’s configure the VPN client on an Apple iPad. Navigate to “Settings” — “General” — “VPN” — “Add VPN Configuration.” We specify the connection type L2TP, description — for instance, “ITLDC VPN,” in the “Server” field we enter our VDS IP address. The password and the “Shared Secret” are our root password from the activation email.

Conclusion
With this, the setup is complete, and you can connect and use your own VPN. We’ll run a small test from our iPad, which is connected to a regular city Internet provider.
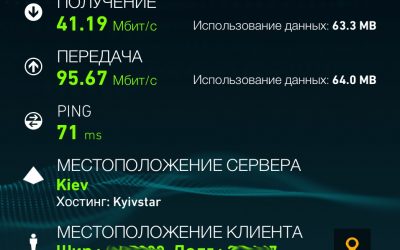
And below is the speed check using the VPN:
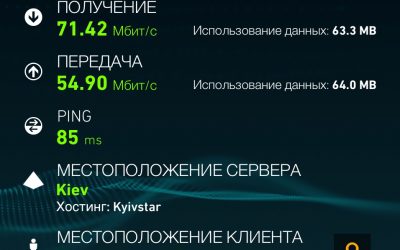
A careful reader may notice that the ping value is relatively high, as the test was conducted in a realistic setting — the iPad is located about ~2000km from the VPN server.
Want to Start Using Your Own VPN Right Now?
Order any virtual server on SSD drives, enter the coupon VPN-ON-VDS and a permanent 10% discount will be in your pocket! If you prefer OpenVPN — you can choose that type of VPN as well or ask support for assistance. Join us!
Need Help?
Our support team is available 24/7 to assist you with any questions or issues.
Contact Support